
Getting Started
Your first COPC analysis, step by step
Section titled “Your first COPC analysis, step by step”This page walks you through the whole thing once, in order, assuming you have never used Uspeech before. At the end you will have:
- an evaluation rubric — your own scorecard, in Uspeech
- a call project that scores every recording you upload against it, on its own, within minutes of upload
- a QA dashboard covering every call analyzed so far
Setting it up takes about twenty minutes. After that, uploading recordings is the only thing left to do.
Everything below uses the web interface and recordings you upload by hand. If you would rather send calls from your own systems, the API Reference does the same job.
Before you start
Section titled “Before you start”Have these ready:
- The evaluation form you already use. COPC scoring in Uspeech is your existing scorecard, criterion by criterion, with the points you already assign.
- A few recordings. Five to ten is plenty for a first pass — enough to judge the results, small enough to redo if the rubric needs work.
- Optionally, a CSV of call details — when each call happened and which agent handled it. Uspeech can work without it, but the report is much better with it.
Step 1 — Build your evaluation rubric
Section titled “Step 1 — Build your evaluation rubric”The rubric is the scorecard. Every call is scored criterion by criterion against it.
- Click Settings in the left navigation
- Open the Evaluation Rubrics (COPC) tab
- Click New Rubric
- Give it a Name (for example Customer Service QA) and, optionally, a Description
- Add your criteria — either Add Criterion one at a time, or Import CSV to load them all at once
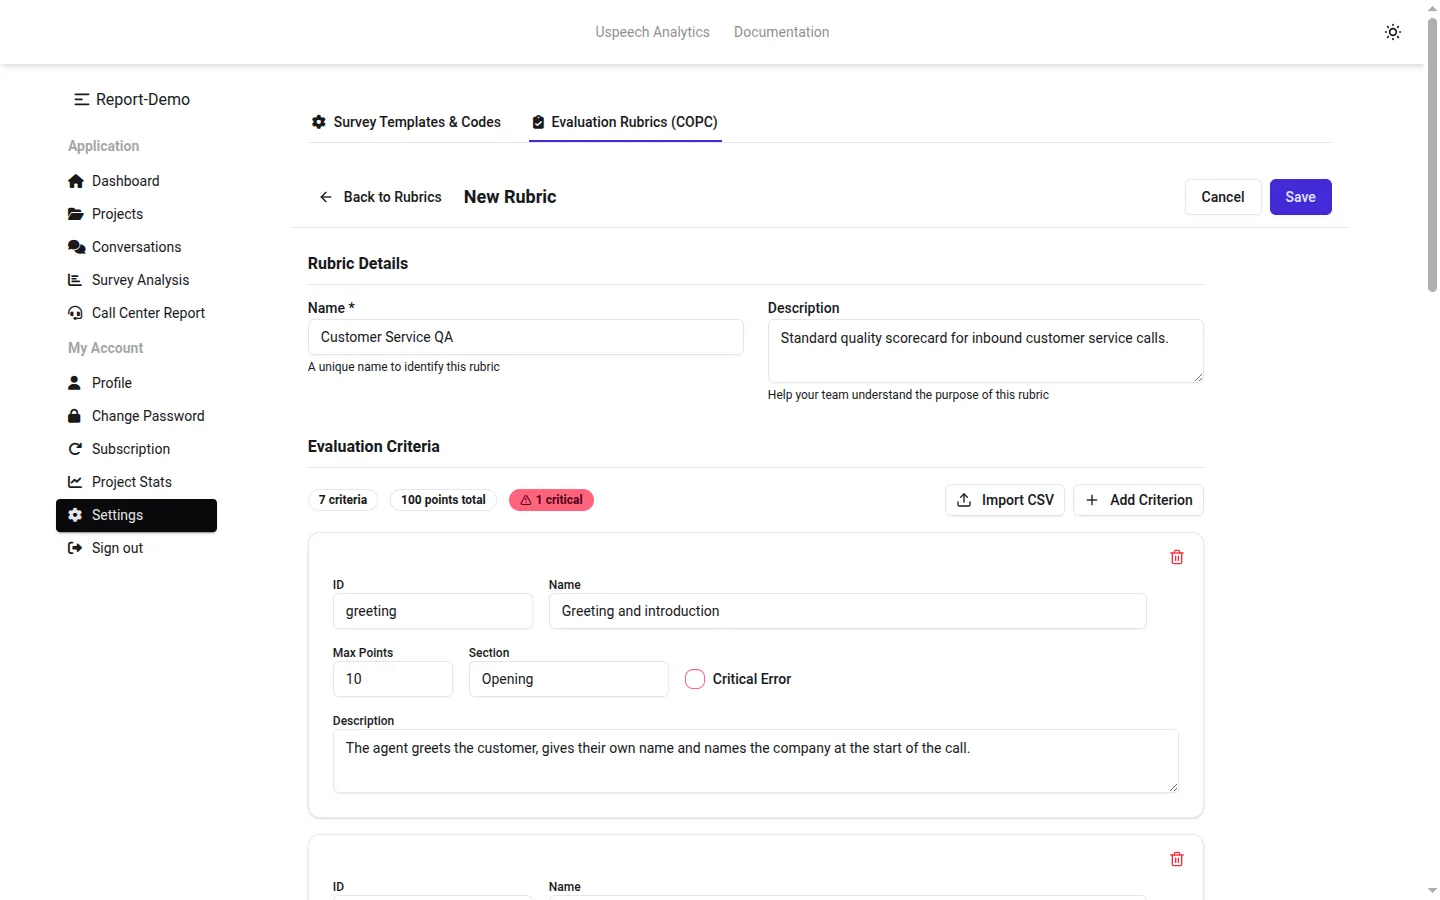
Each criterion has an ID, a Name, Max Points, an optional Section (Opening, Handling, Closing…) and a Critical Error switch. A criterion marked critical fails the whole call when it scores 0 — reserve it for genuinely non-negotiable things like identity verification.
The header keeps a running count: 7 criteria, 100 points total, 1 critical. Click Save when the totals match your paper form.
To import criteria from a spreadsheet, save it as CSV with the columns id, name, description, max_points, is_critical, section. A header row is fine — the importer recognises and skips it.
See Evaluation Rubrics for the full reference.
Step 2 — Create the call project
Section titled “Step 2 — Create the call project”- Click Conversations in the left navigation
- Click New Project
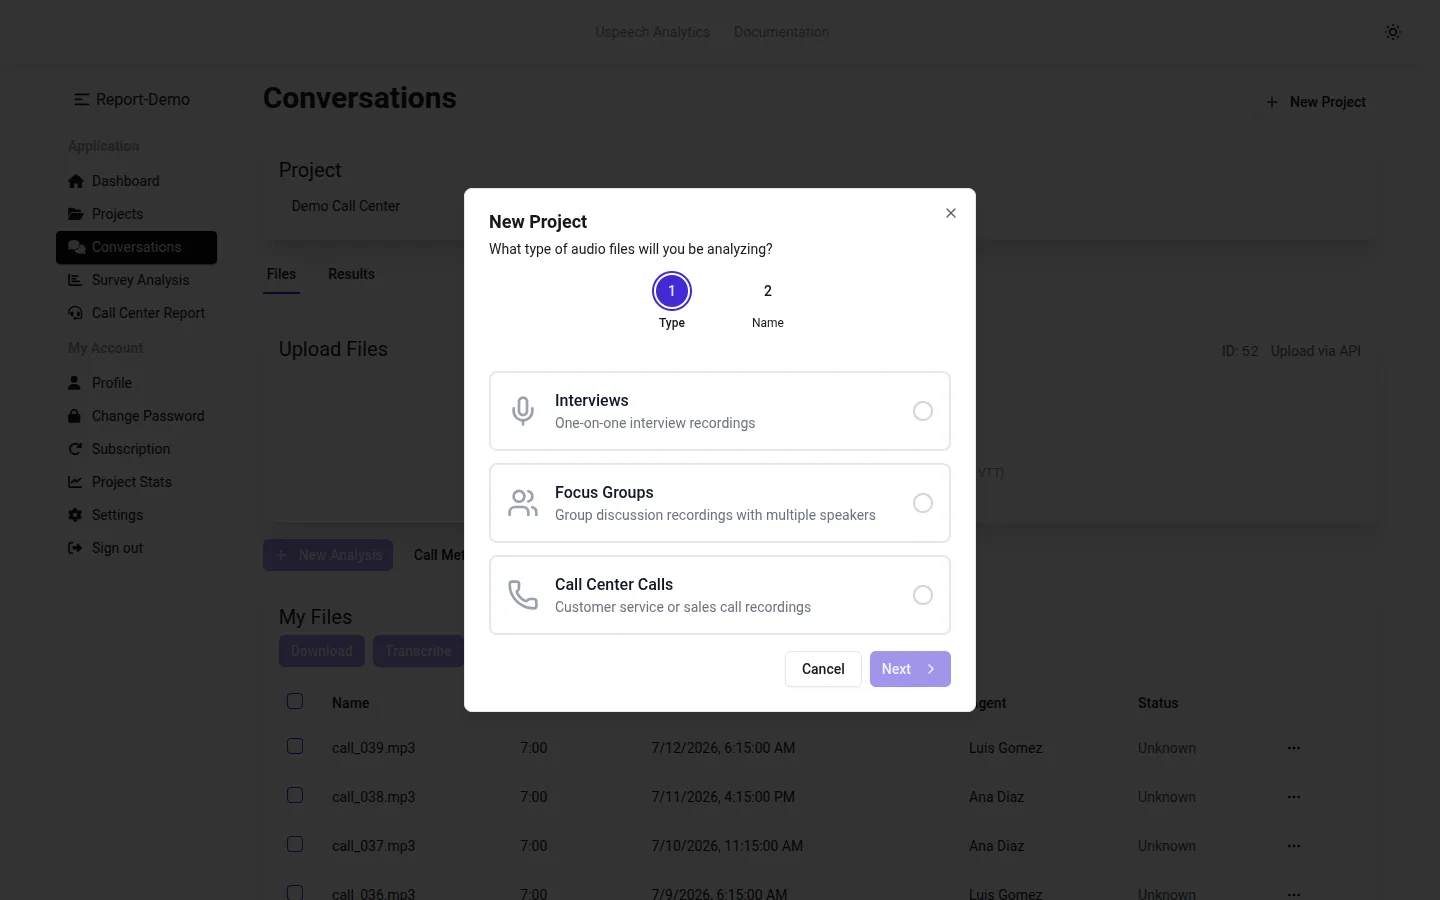
- Choose Call Center Calls — “Customer service or sales call recordings”
- Click Next, type a Project Name, and click Create
Step 3 — Look at the project settings
Section titled “Step 3 — Look at the project settings”Click Configuration next to the project name. The Project Settings dialog has two halves.
The top half — Audio File Type, Return Timestamps, Language — is greyed out: “Transcription settings cannot be changed after a project is created.” It is there so you can check what the project was created with.
Everything below it can be changed at any time. Two settings are worth a look before you upload anything:
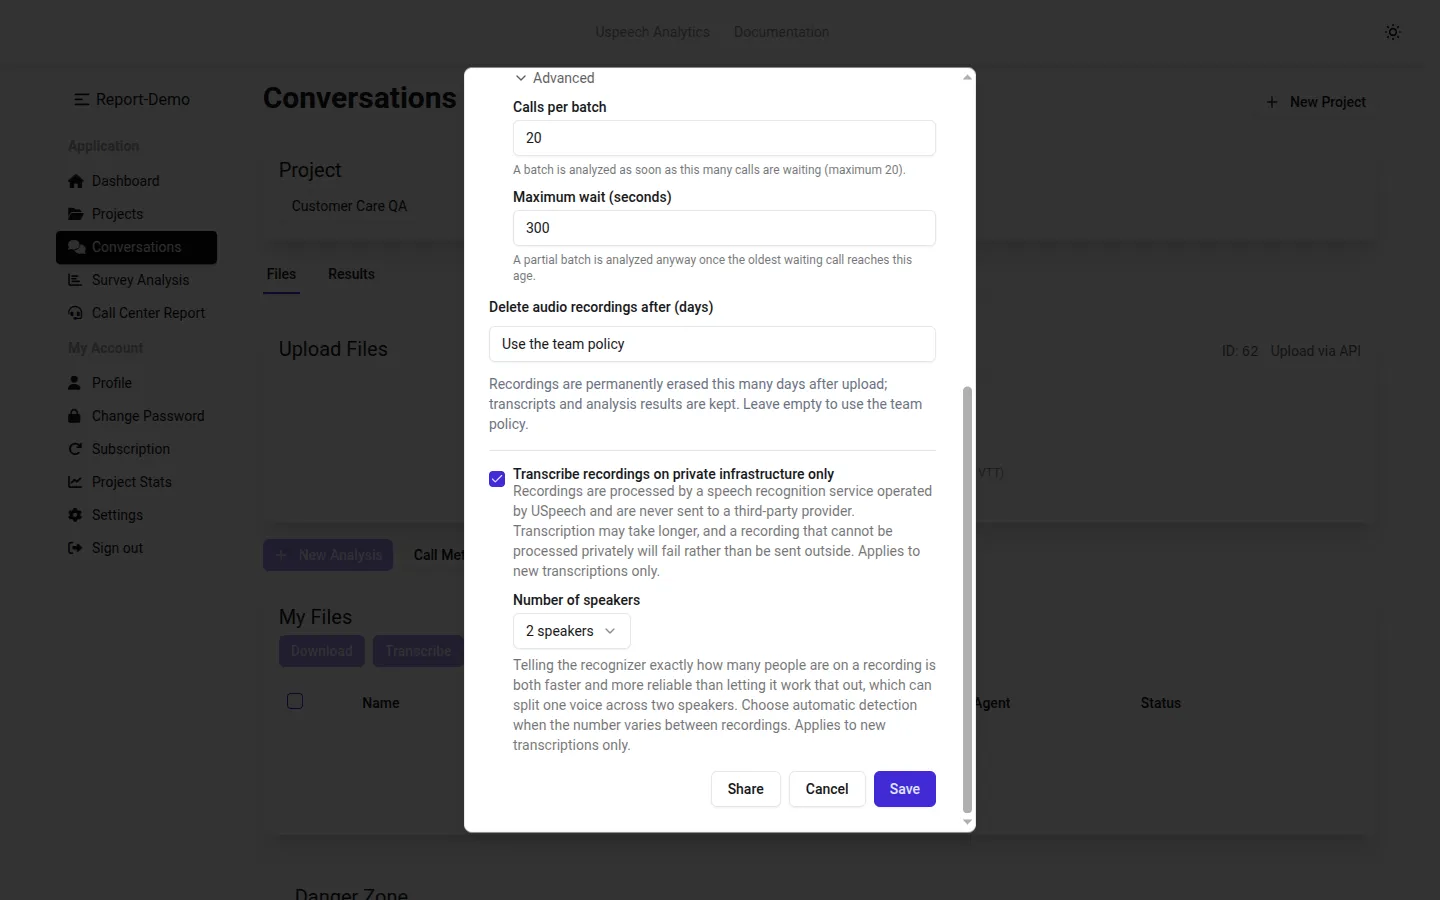
- Delete audio recordings after (days) — recordings are erased permanently this many days after upload, while transcripts and analysis results are kept. Leave it empty to follow your team’s policy.
- Transcribe recordings on private infrastructure only — recordings are processed by a speech recognition service operated by Uspeech and never sent to a third-party provider. Transcription may take a little longer, and a recording that cannot be processed privately fails rather than being sent outside. Your team may have switched this on for every project, in which case it is locked.
- Number of speakers appears underneath it. A call project defaults to 2 speakers, which is both faster and more accurate than making the system work the count out for itself. Choose Detect automatically only if the number genuinely varies — calls that get transferred, or where a supervisor joins.
Both settings apply to new transcriptions only; recordings already processed are unaffected.
Step 4 — Turn on automatic scoring
Section titled “Step 4 — Turn on automatic scoring”This is the step that makes the difference between “I ran an analysis once” and “our calls are scored as they arrive”.
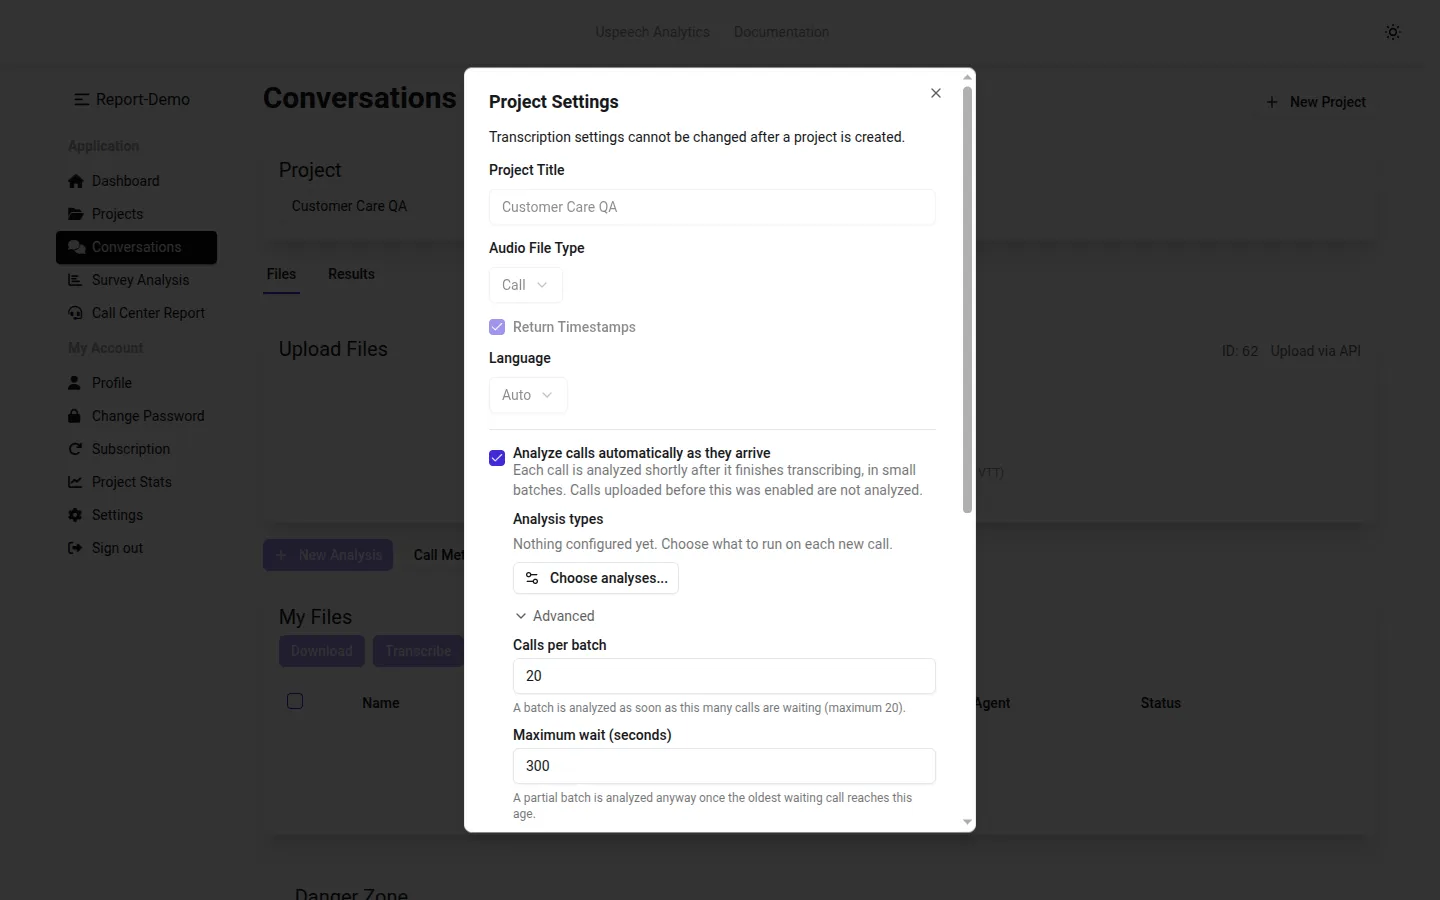
- In the same dialog, tick Analyze calls automatically as they arrive
- Click Choose analyses…
- Choose Predefined Analysis, then Next
- Select COPC Evaluation — “Score calls against a weighted evaluation rubric” — then Next
- Pick the rubric you built in Step 1 and click Save configuration
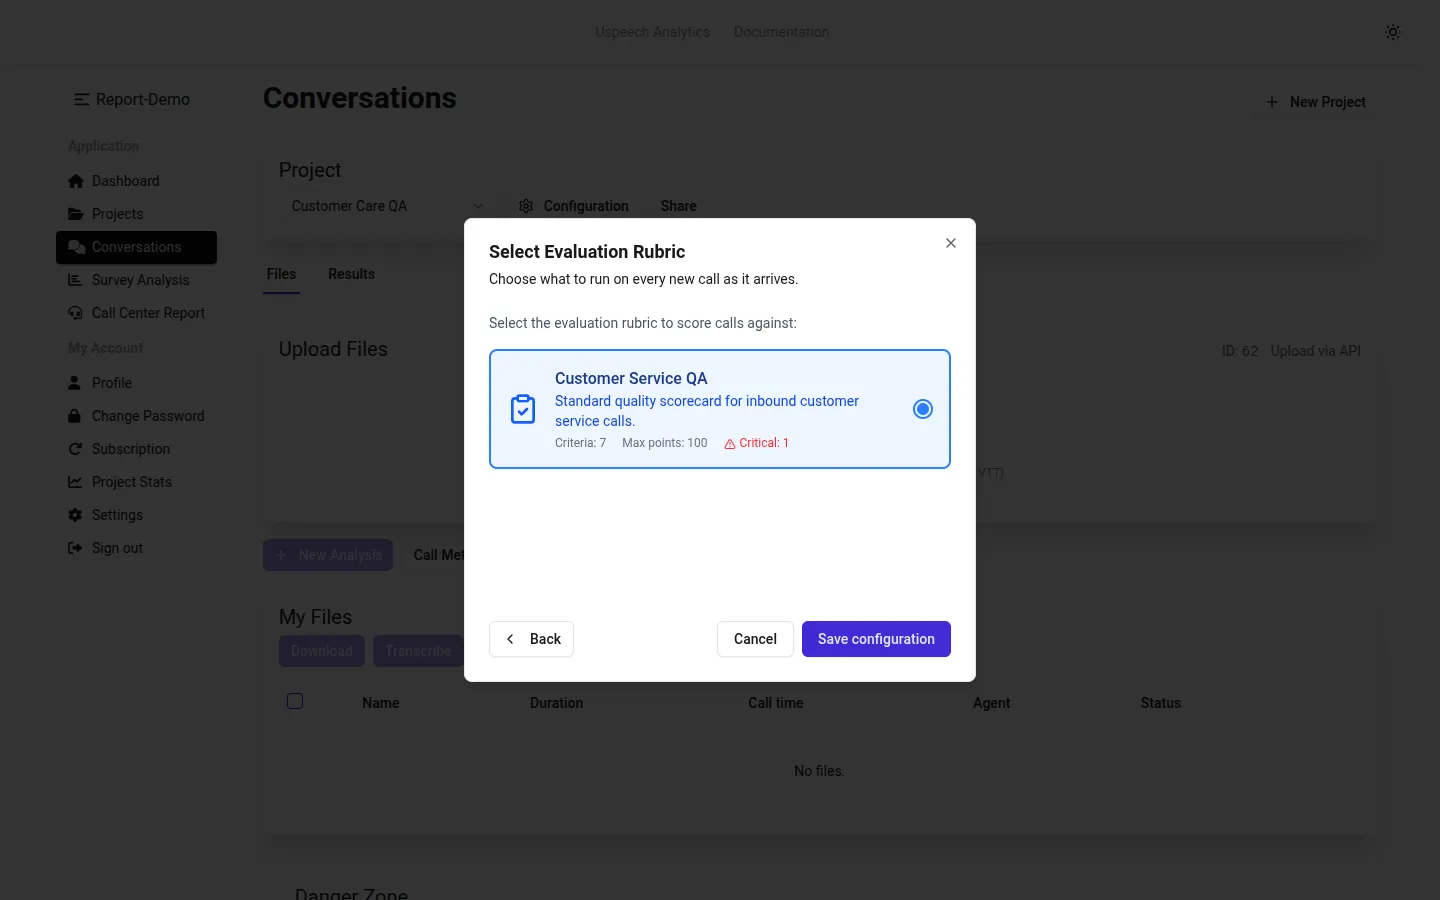
The settings dialog reappears with a summary of what will run — COPC Evaluation, Rubric: Customer Service QA — and the button now reads Configure…, which is how you change it later.
Click Save to close the dialog.
Under Advanced you will find how often batches run: Calls per batch (a batch starts as soon as this many calls are waiting, maximum 20) and Maximum wait (seconds) (a partial batch goes anyway once the oldest waiting call reaches this age, 300 by default). The defaults suit bulk uploads; lower the wait if you are trickling calls in and want to see results sooner.
Step 5 — Upload your recordings
Section titled “Step 5 — Upload your recordings”Back on the Files tab, drag your recordings onto the upload area, or click it and pick them.
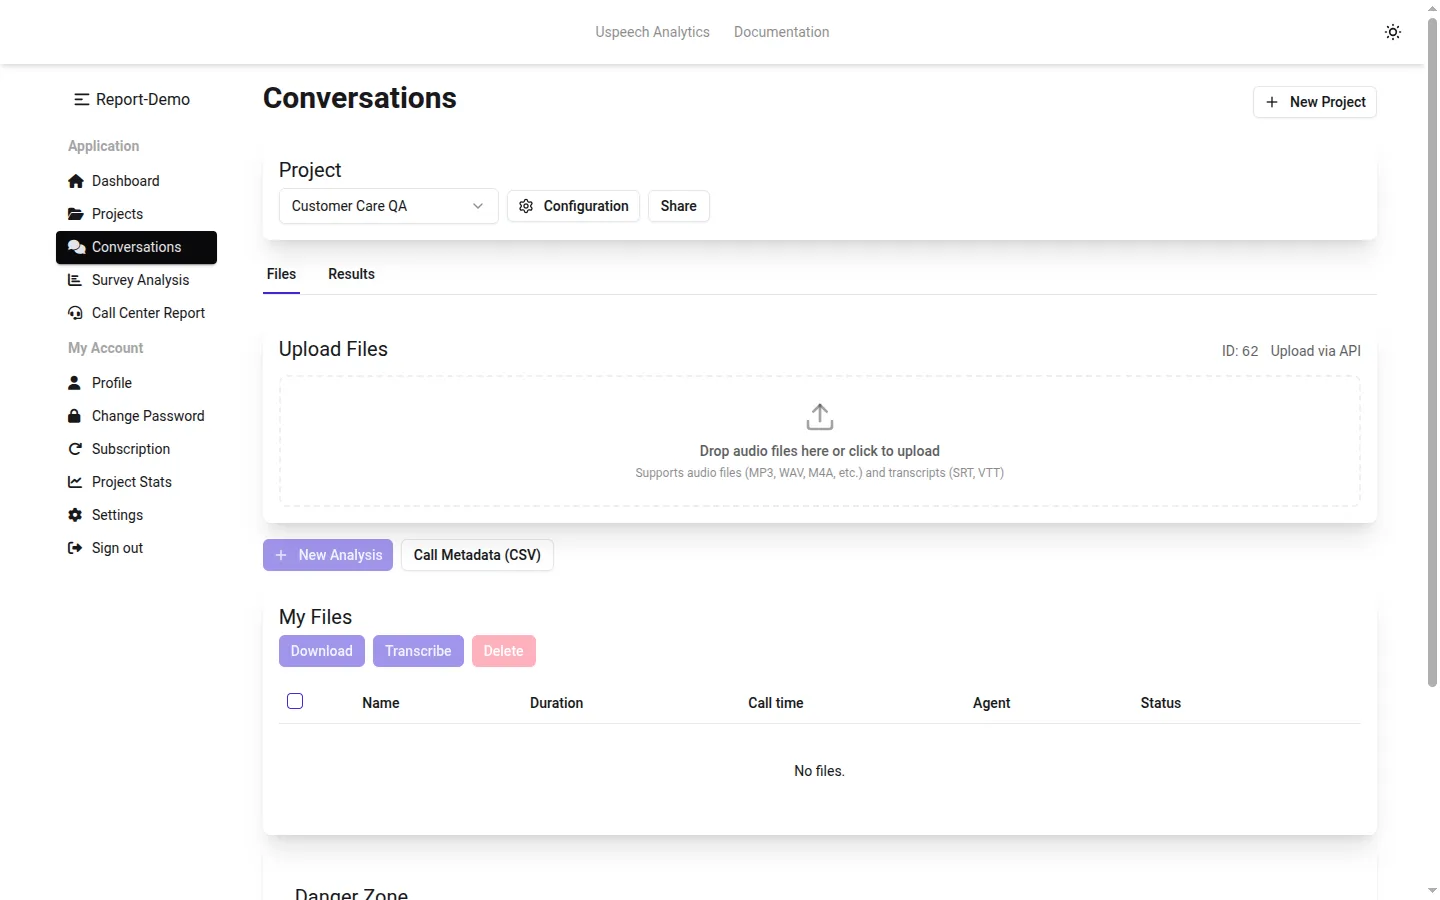
It takes audio (MP3, WAV, M4A and similar) and ready-made transcripts (SRT, VTT). Transcripts skip transcription and go straight to analysis.
There is no button to press after uploading. Transcription starts by itself, and the Status column tells you where each file is:
| Status | Meaning |
|---|---|
| Uploaded | Received, not yet started |
| Transcribing | Being transcribed |
| Transcribed | Ready — analysis will pick it up |
| Failed | Something went wrong; the reason appears under the status |
A Transcribe action appears in a file’s ⋯ menu only when transcription did not start automatically — normally because the subscription had no minutes left at that moment.
Step 6 — Tell Uspeech when each call happened
Section titled “Step 6 — Tell Uspeech when each call happened”Uspeech knows what was said inside a call. When it happened, who handled it and which campaign it belonged to has to come from your systems. Without it, calls are placed by upload time, the shift comparison cannot run, and agents are identified only by the name spoken aloud in the recording.
- Click Call Metadata (CSV) on the Files tab
- Choose a CSV with the columns
filenameandcall_datetime(required), plusagent_id,agent_name,direction,caller_numberandcampaign(optional) - Click Upload
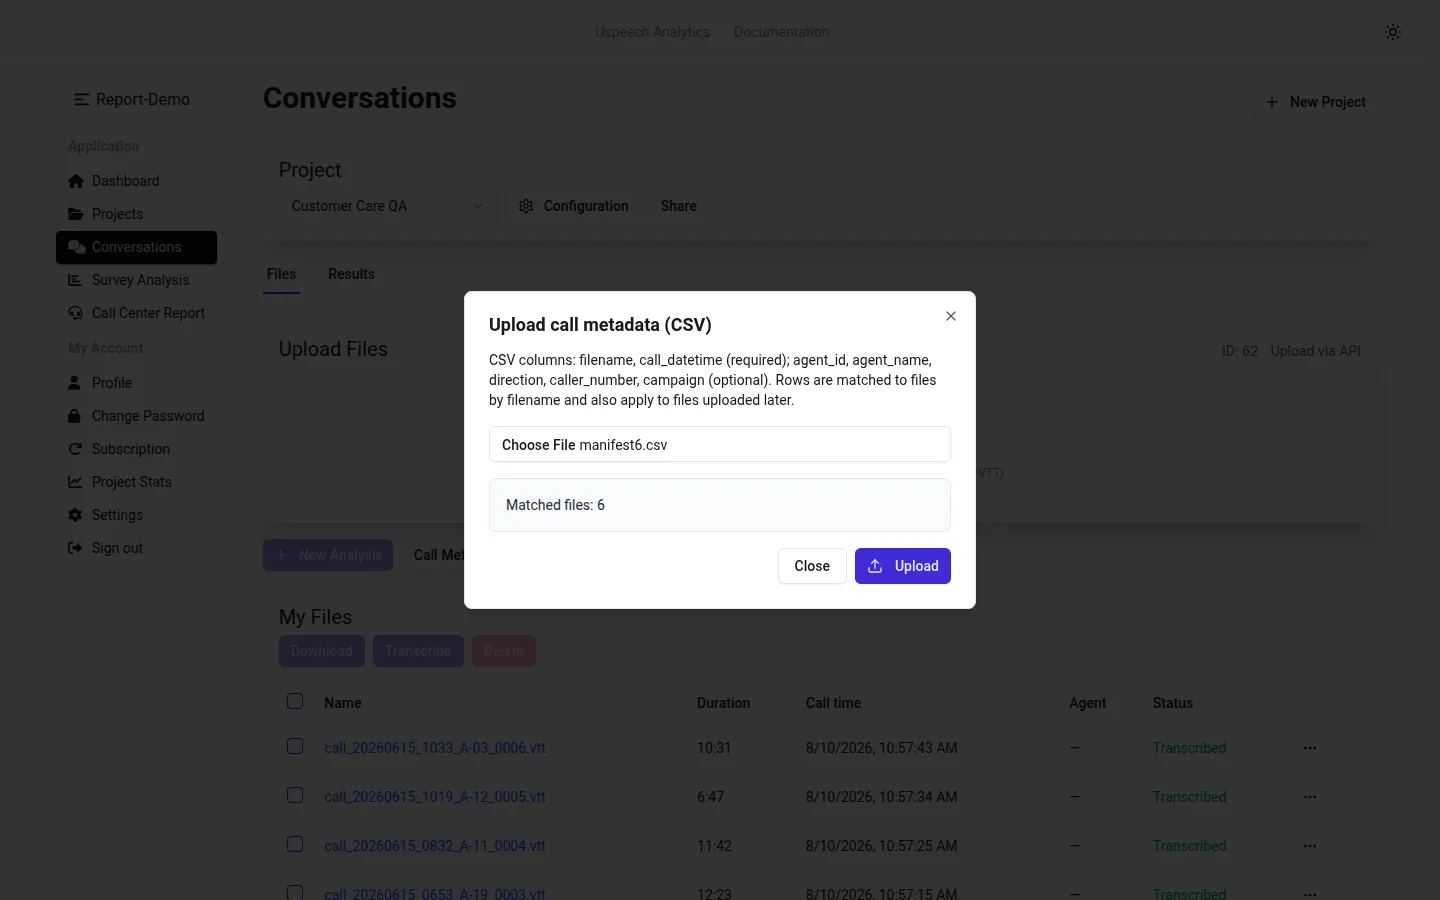
The dialog reports Matched files and, if some rows have no matching recording yet, Pending (no file yet) — those are kept and applied to files uploaded later, so the manifest can go up before, during or after the recordings.
The Call time and Agent columns in the files table fill in immediately:
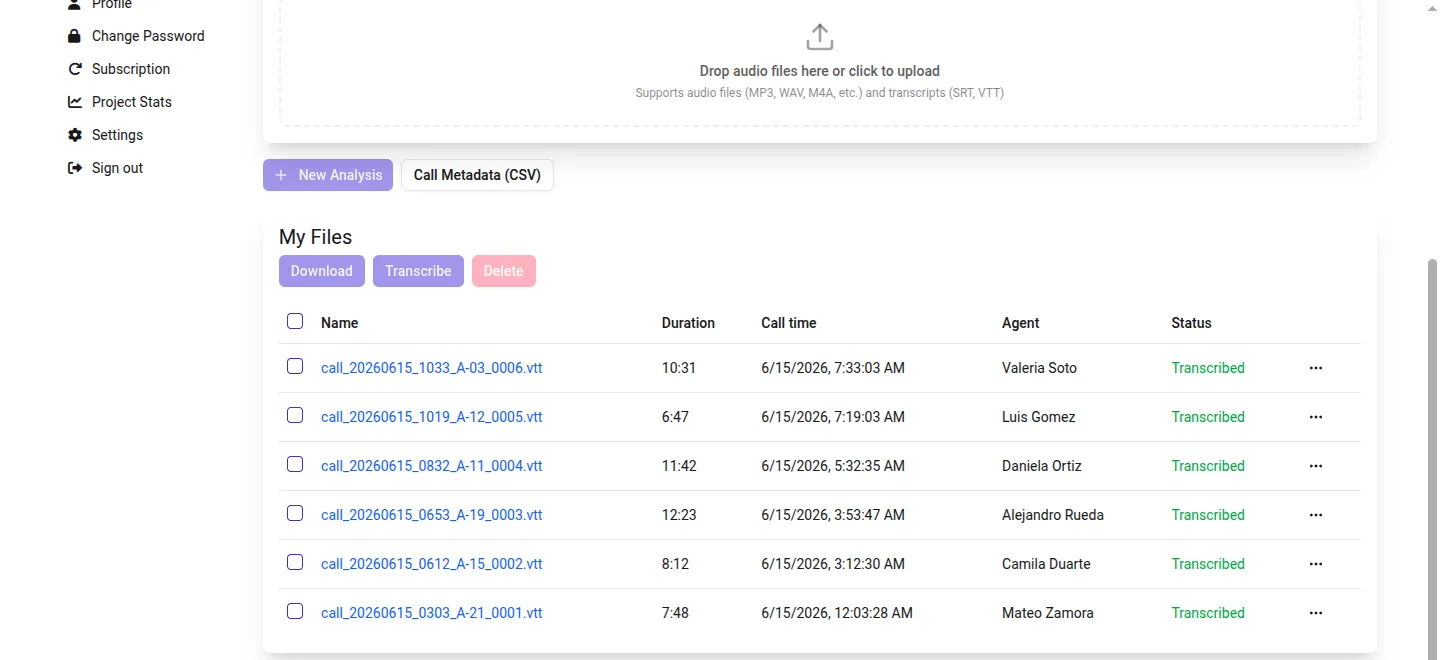
See Call Metadata for the accepted date formats and how rows are matched.
Step 7 — Wait for the first batch
Section titled “Step 7 — Wait for the first batch”Calls queue up as they finish transcribing and are analyzed in batches — as soon as 20 are waiting, or when the oldest has waited 5 minutes, whichever comes first. With a handful of calls, expect results in about five minutes.
Switch to the Results tab. You will see one COPC Evaluation entry carrying an all analyzed calls badge:
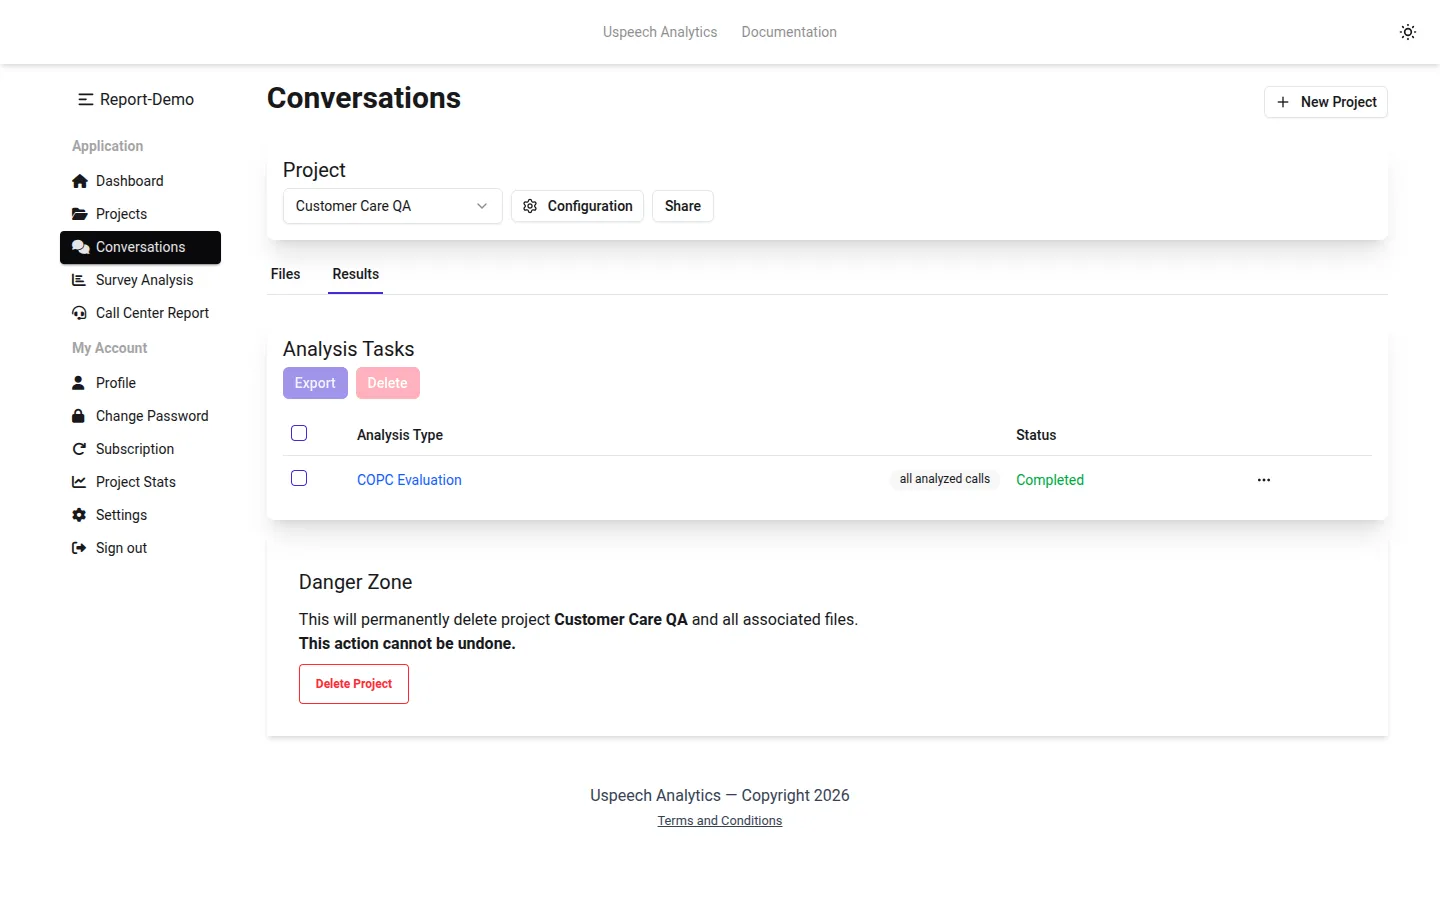
That single entry always covers every call analyzed so far. Batches are folded into it rather than listed separately, so there is nothing to stitch together later.
Step 8 — Read the scores
Section titled “Step 8 — Read the scores”Open the result. It has two views.
Dashboard gives you the shape of the whole batch: how many calls, the average score, how many critical errors, the passing rate, and a Score by Criterion chart showing where agents lose points.
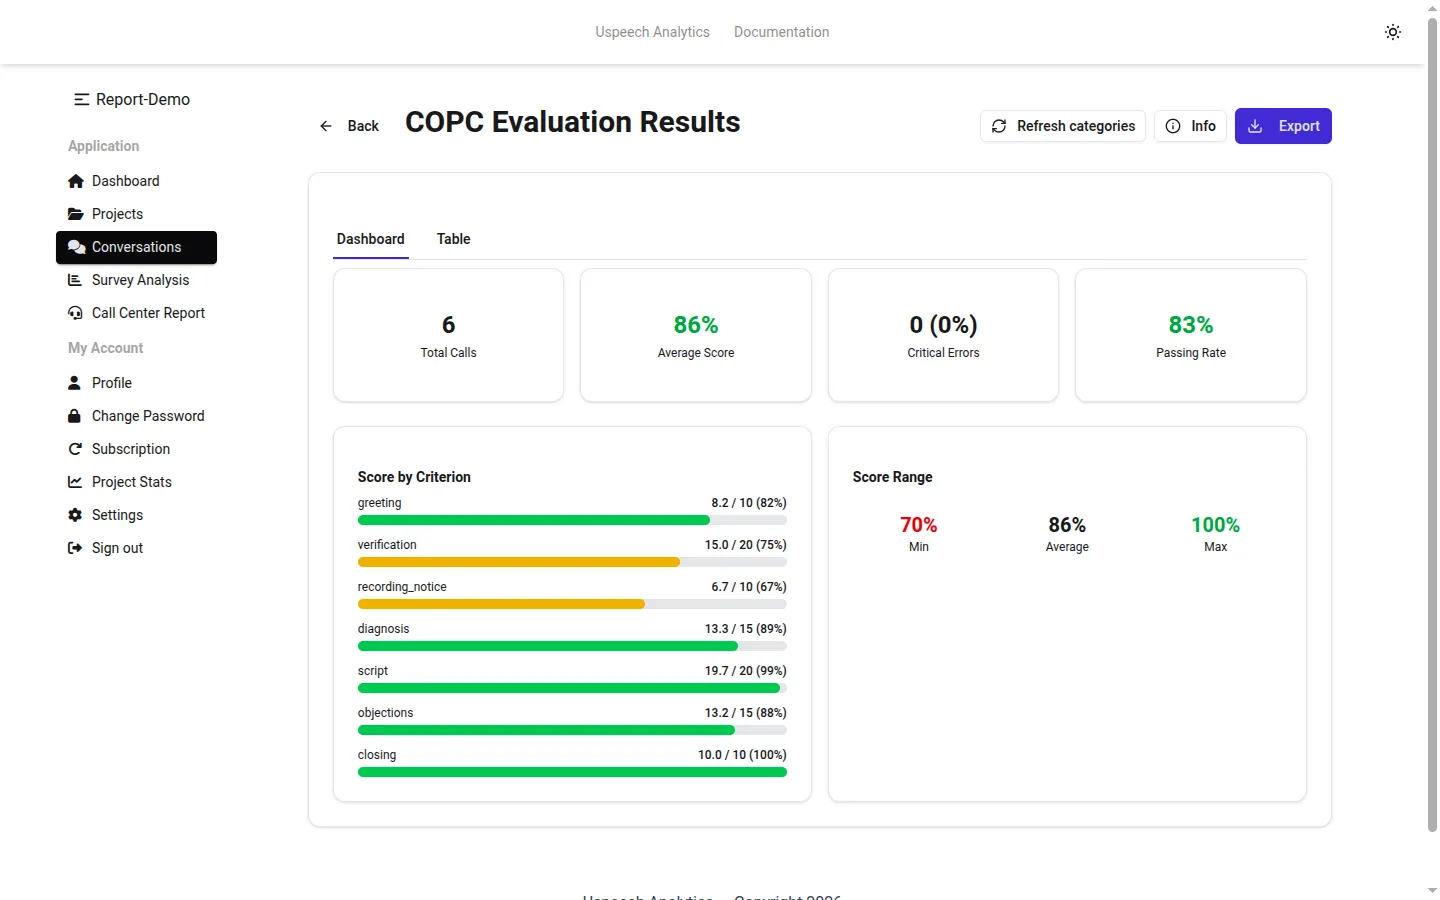
Table lists every call with its score, whether a critical error fired, its topic and its sentiment — plus agent, call date, direction, number and campaign once you have uploaded metadata. Expand a row to see the criterion-by-criterion breakdown: points awarded, the AI’s Justification, and the Quote from the transcript it relied on. Click the quote’s transcript icon to jump to that moment and check it against what was actually said.
More detail in Understanding Results.
Step 9 — Open the Call Center Report
Section titled “Step 9 — Open the Call Center Report”A result answers questions about a set of calls. The Call Center Report answers questions about the operation — click it in the left navigation.
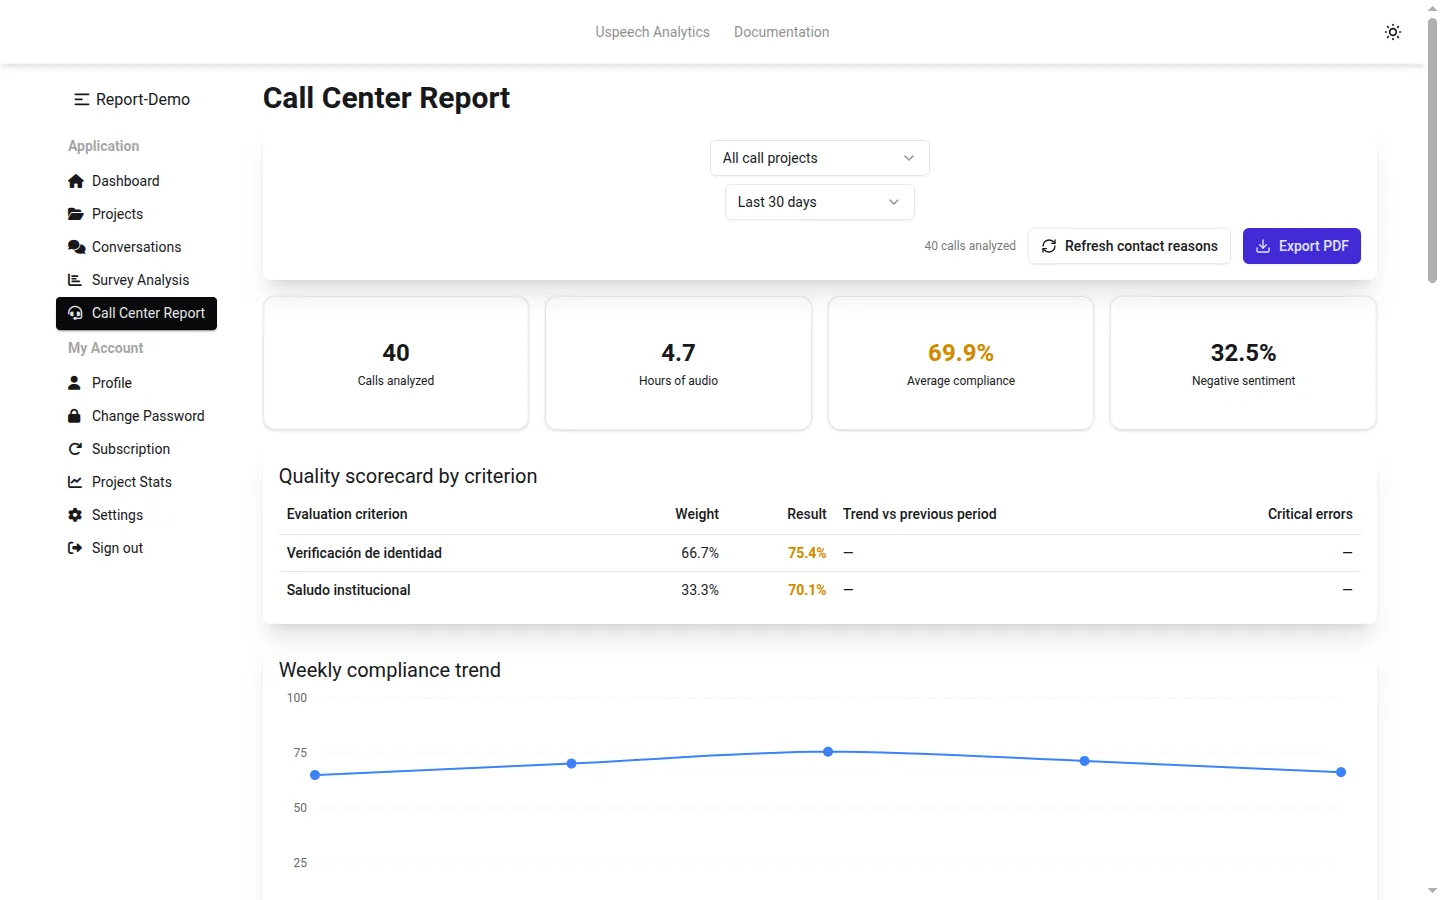
Set the date range first. The report opens on Last 30 days and filters by the call date from your metadata, so historical recordings can make a freshly populated report look empty. When that happens the report says so and offers a Show all time button.
From the top down you get headline metrics, a quality scorecard per criterion with a trend against the previous period, a weekly compliance trend, contact reasons, a day-versus-night shift comparison, an agent league table, and a searchable browser over every analyzed call. Export PDF turns the current view into a client-ready document with an executive summary and recommendations.
See Call Center Report.
Step 10 — Calibrate before scaling up
Section titled “Step 10 — Calibrate before scaling up”Before pointing the whole operation at it, score five to ten calls yourself and compare:
- Scores too harsh or too generous on one criterion? Sharpen its description — say what “full marks” looks like.
- Everything scoring 0%? Too many criteria are marked critical.
- A criterion the AI keeps missing? It is probably assessed on something not audible in the call. Drop it, or reword it around what is said.
- A short call scoring unexpectedly high? Usually correct — criteria the call never reached are skipped and awarded in full. How Scoring Works covers what gets skipped and what never does.
Edit the rubric under Settings → Evaluation Rubrics (COPC). Results already produced keep the version of the rubric that scored them, so a rubric edit affects calls analyzed afterwards only — change it early, while there is little history to compare against.
If something doesn’t look right
Section titled “If something doesn’t look right”| What you see | What it usually means |
|---|---|
| No COPC Evaluation in the wizard | The project is not a Call Center Calls project. Its type cannot be changed — create a new one. |
| No evaluation rubrics found | The rubric has not been created yet. Do Step 1 first. |
| Results tab still empty | The calls were uploaded before automatic analysis was turned on, or they are still transcribing. Check the Status column. |
| A call missing from the report | Check the Files tab. Automatic analysis skipped — quota exceeded means your subscription had no minutes left to cover it. |
| The report shows zeros | Almost always the date range — try Show all time. |
| Call time in grey | No metadata for that call yet; the upload time is standing in. |
Next steps
Section titled “Next steps”- Quick How-To — the same tasks, without the narrative
- Automatic Analysis — batching, merged results and changing the configuration later
- Call Metadata — CSV format, matching rules and per-call editing
- How Scoring Works — what the evaluator applies on its own, and how to read a criterion that did not apply
- Tips for Best Results — rubric design and interpreting scores
- FAQ